To change the time on your laptop, open Settings, go to Time & Language, and edit the time. Adjust the date and time settings manually or toggle the automatic options.
Changing the time on your laptop is a straightforward task that ensures your system clock matches the local time zone or your preferred time setting. Whether crossing time zones or fixing a watch that’s gone astray, a correct time display is crucial for staying on schedule with your appointments and system updates.
With a few clicks, you can synchronize your laptop’s time with internet time servers or adjust settings to suit your needs. Understanding how to manage your device’s time settings helps organize files and ensure time-sensitive applications run smoothly. It’s a simple yet essential skill for personal and professional laptops.

Introduction To Time Settings On Laptops
Setting the correct time on a laptop is vital. Laptops carry out many time-sensitive tasks. They need the right time to work well. Here’s how to do it quickly and easily.
Importance Of Accurate Time
Every laptop must show the right time. This prevents problems in your work. It helps with organizing files and setting reminders, too. Let’s make sure your time is always spot on!
Common Reasons For Time Adjustments
- Travel: Crossing time zones need a time change.
- Daylight Saving: Some countries shift their clocks twice a year.
- Battery Issues: When a laptop battery gets old, time might reset.
- Manual Errors: Sometimes, we set the time wrong by mistake.
Changing the time is not hard. Your laptop lets you do it in a few clicks.
How To Change The Time On Your Laptop
- Open your Settings by clicking the gear icon.
- Choose Time & Language.
- Go to Date & Time.
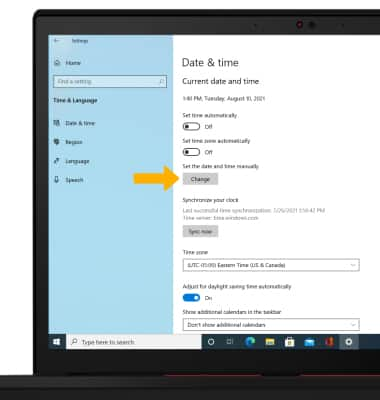
- Turn off the Set time automatically.
- Click Change under Set the date and time manually.
- Set the new time.
- Hit Change to apply.
Keep your laptop’s time perfect. It’s simple. Now you know how.
Preparing To Change Time Settings
Welcome to your guide on Preparing to Change Time Settings on your laptop. Whether for daylight savings, traveling across time zones, or fixing a simple drift in your system clock, adjusting the time on your computer is a straightforward process. Before diving into the steps, covering some essential preparations is crucial. These ensure you have a hassle-free experience when updating your system’s time.
Checking System Permissions
Your laptop’s time settings are usually set to update automatically. Sometimes, you might need to make manual adjustments. But first, check that you have the necessary permissions. Here’s how to verify:
- Go to Settings: Access your system settings from the start menu.
- User Account: Ensure you are logged in with an administrator account.
- Permission Prompt: If prompted, enter the admin password or confirm that you wish to make changes.
Understanding Time Zones
Time zones can be tricky, so a basic understanding is critical. Your laptop can show time for any region in the world. It’s essential to select the correct time zone for accurate time display. Here’s what to remember:
- Identify Your Zone: Know the time zone of your current geographical location.
- Automatic or Manual: Decide if you want your device to adjust the time automatically based on location or if you prefer to set it manually.
- Daylight Savings: Remember to account for daylight savings if it applies to your zone.
Step-by-step Guide To Changing Time In Windows
Accurate time settings are essential for daily tasks, appointments, and computer functions. If you’re new to Windows or have not changed your time settings, follow this easy guide. This step-by-step tutorial will make the process quick and straightforward.
Accessing Time And Date Settings
To begin, you need to open your Time and Date settings. Press the Windows key + I to open the Settings app. Look for ‘Time & Language’ and click on it. Select ‘Date & Time’ from the left-hand menu to view your current settings.
Manually Adjusting The Time
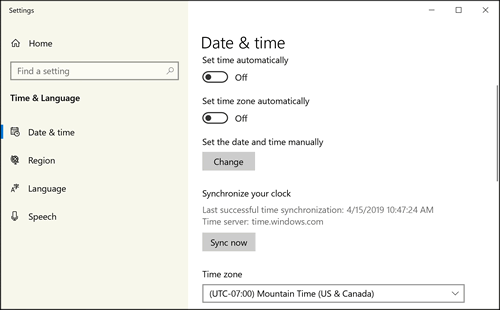
Often, your laptop will set the correct time automatically. If this isn’t the case, a manual adjustment is necessary. Turn off the ‘Set time automatically’ option. Then click the ‘Change’ button under ‘Set the date and time manually.’ Enter the correct time. Click ‘Change’ to save your settings. You will see the new time displayed instantly.
- If your time zone is incorrect, scroll to ‘Time zone.’
- Open the dropdown menu and select the correct time zone.
- Your laptop clock will update to match the selected time zone.
Altering Time On Maco Laptops
MacOS laptops offer a sleek interface to adjust time settings.
Whether for travel or daylight saving adjustments, changing the time is straightforward.
Follow these steps for a quick and easy time update.
Navigating To System Preferences
Start by clicking the Apple logo on the top left of your screen. Select “System Preferences” from the dropdown. This will open the settings for your laptop. Look for the “Date & Time” icon and click it to proceed.
Setting Time Using Location Services
For automatic time setting, enable location services. Click the lock icon to make changes. Enter your administrator password. Then, check the “Set date and time automatically” box. Your MacBook will use location services to update the time based on your current region.
| Task | Action |
|---|---|
| Open System Preferences | Click Apple logo > System Preferences |
| Access Date & Time | Click on the Date & Time icon |
| Unlock Settings | Click the lock icon |
| Enable Auto Setup | Select “Set date and time automatically.” |
Alternatively, set the time manually. Uncheck the automatic setting box. Choose the current time zone from the map. Adjust the date and time as needed.
- Click Apple icon
- Select “System Preferences”
- Choose “Date & Time”
- Adjust manually if preferred
Remember, keeping the correct time on your laptop ensures your files have accurate timestamps. This keeps your schedule on track.
With these steps, your MacOS laptop will display the perfect time in no time!
Adjusting Time For Linux-based Systems
Is the clock on your Linux laptop showing the wrong time? Don’t worry. Changing the time is a simple process. You can use the command line or the graphical user interface (GUI). Both methods are quick and easy. Let’s walk through each step.
Using The Command Line
To adjust the time using the terminal, follow these steps:
- Open the terminal. You can find it in your applications menu or use a shortcut, usually Ctrl+Alt+T.
- Type
sudo timedatectl set-time 'YYYY-MM-DD HH:MM:SS'. - Replace YYYY-MM-DD with the current year, month, and day.
- Replace HH:MM: SS with the current hour, minute, and second.
- Press Enter and input your password if prompted.
That’s it! Your system time should now be updated.
Graphical User Interface Methods
If you prefer not to use the command line, the GUI method is for you:
- Click on the time in the top panel.
- Select Settings or Date & Time, depending on your distribution.
- Toggle Automatic Date & Time off if it’s on.
- Manually set the date and time, or choose a time zone.
The changes will save automatically, giving you the correct time instantly.
Troubleshooting Common Time Adjustment Issues
Troubleshooting expected time adjustment issues on your laptop can be a hassle. Your computer’s clock may refuse to update or display the correct time despite your efforts. Don’t worry! I’ll guide you through some typical challenges and their fixes.
Dealing With Permission Errors
Encountering permission errors can be frustrating when updating the time on a laptop. Here’s what to do:
- Ensure you are logged in as an administrator.
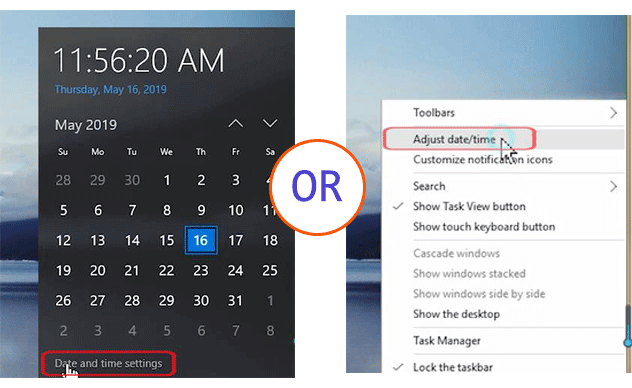
- Right-click on the time display and select ‘Adjust date/time.’
- If prompted, enter the admin password.
- Try syncing the clock again.
If the issue persists, check for disabled services that manage time synchronization:
- Press
Windows Key + Rand typeservices.msc. - Look for the ‘Windows Time’ service.
- Set its status to ‘Automatic’ and start it.
Admin access ensures changes in system settings, including time adjustments.
Resolving Incorrect Time Zone Problems
Your laptop might show the wrong time if it is set to an incorrect time zone. Here’s an easy fix:
- Open ‘Settings’ by pressing
Windows Key + I. - Select ‘Time & Language’.
- Go to the ‘Date & Time’ tab.
- Turn off the ‘Set time zone automatically’ toggle.
- Choose the correct time zone from the dropdown menu.
- Toggle’ Set time automatically’ on and off again.
Adjusting these settings can quickly resolve any discrepancies with your laptop clock.
Maintaining Accurate Time Automatically
Keeping your laptop’s clock precise does more than tell time. It ensures your files have correct timestamps and your online appointments stay on schedule. Modern laptops can manage time settings almost hands-free. Explore two innovative ways to maintain the right time on your computer automatically.
Enabling Internet Time Synchronization
Laptops with internet access can sync clocks automatically. This feature uses time servers online to maintain accurate time. Follow these steps:
- Go to the clock on your taskbar and right-click it.
- Select ‘Adjust date/time’.
- In settings, toggle ‘Set time automatically’ to on.
- Click the ‘Sync now’ button under ‘Synchronize your clock’.
Using Third-party Software Solutions
Can’t sync with the internet? Third-party software can help. These programs work similarly to internet synchronization. They ensure your laptop’s clock matches global time standards. Look for trusted software with positive reviews. Consider privacy policies before downloading.
- Download the time synchronization app.
- Install and run it following on-screen instructions.
- Please set it to update the time automatically.


change the time on your laptop
Frequently Asked Questions For How To Change Time In Laptop -Quick And Easily
How Do I Correct The Time On My Laptop?
To correct the time on your laptop, open Settings, go to Time & Language, and select Date & Time. Enable ‘Set time automatically’ or manually adjust the time.
How Do I Change The Date And Time On My HP laptop?
To change the date and time on your HP laptop, open the ‘Settings’ app. Click ‘Time & Language,’ then select ‘Date & Time’ and adjust.
How Do I Get My Laptop To Change Time Zones Automatically?
To enable automatic time zone updates on your laptop, go to “Settings,” then select “Time & Language. “Click on “Date & Time” and toggle “Set time zone automatically” to On.
Why Is My Laptop Have The Wrong Time?
Your laptop may display the wrong time due to a depleted CMOS battery, incorrect time zone settings, or synchronization issues with internet time servers. Ensure your settings are correct, and consider replacing the CMOS battery if necessary.
Conclusion
Adjusting the time on your laptop can be done with a few simple steps. This guide aimed to demystify the process and ensure that anyone, regardless of technical skill, can succeed. Regular time checks keep your schedule accurate and your programs running smoothly.
For more tech tips and tricks, keep following our blog.

Welcome to pasarlaptop.net, I am Md Rana Islam. I am a technology Specialized writer and blogger based in the USA & UK. I have three years of experience in Cyber Security, Technology, Social Media and all types of electronic devices like computer laptops etc. So I work on solving these issues and give various tips on these issues.
